Here is the first of my Christmas creations… I had so much fun making these.
They are for a swap I am participating in over at ArtCharms yahoo group.
They are made from goodies from my local reuse/recycle factory recycle store Learning from Scratch. I used metal caps, bead snowmen from a necklace and rubber caps. Put some scrapbook paper in the back, punched a hole in the top to create a loop with a head pin and covered the inside edges with snow paint and some glitter. I filled the cavity partially with ice resin after it hardened added some white mica flakes and watch gears. Then added another layer of resin to seal the parts in. Added some ribbon and a curled ornament hook to finish them off.
afghan
airplane
alcohol ink
altered
altered book
apothecary
ArtPrize
asian
atc
baby
basket weave
bats
beads
beads necklace kumihimo
beeswax
beveled glass
bird
bird cage
birds
black
blanket
bling
blood
bones
bottles
bracelet
brass
bronze
bug
Bunnies
burlap
butterfly
button
buttons
cabinet
camera
candy corn
canvas
cat
cats
chalk
charlotte
charm
charm copper metal grundge embossed patina
charms
chick
chicks
christmas
christmas tree
clock face
clock parts
cloth
coins
cold connection
collage
color
copper
corsets
cream
CREATE 2011
creepy
crochet
crows
crystal
cuckoo clock
dew drop
doll
dolls
doors
easter
eggs
embossed
etched
etching
eye
eyeball
eyeballs
fabric
face
fairy
fat book
faux tintytpe
feather
felted
fingers
flower
flowers
fold formed
fork
friends
game
garage door hook
garden
gears
ghost
ghosts
girls
glass
glass slide
glitter
gnome
goggles
gold
goose
Grand Rapids
grundge
halloween
hat
haunted house
hearts
hedgehogs
hens and chicks
house
humpty dumpty
images
ink
Jack-o-lantern
jewelry
journal
kids
knitting
lace
ladies
lenticular
lucite
mail
mannequin
measuring tape
men
metal
mice
Michigan
molding paste
moon
moss
mummy
necklace
nest
numbers
orange
ornament
ornaments
owl
paint
paper clay
patina
pencil
pendant
pictures
plumbers tape
portfolio
potions
published
pumpkins
purple
purse
rabbits
rats
ravens
resin
rivet
rub ons
rubber stamp
santa
sewing
shoe
silverware
simple pleasures
skeletons
skulls
snaps
snow
snowman
snowmen
solder
Somerset Gallery
spider
spiders
spooky
stamped
stamping
stamps
steampunk
stencil
swap
swaps
tags
tan
thimble
tim holtz
tintype
tissue paper pattern
tombstones
toy
transfer paper
tree
under the sea
valentines
vampires
victorian
vintage
watch
web
window
wings
wire
wire sun
wire wrapped
witch
witches
wood
worry doll
wreath
zipper
Sunday, November 24, 2013
Thursday, November 7, 2013
What a month!!!! But I guess late is better than never
October is usually my most active month. This year I came down with a flu/cold/whatever thing. It knocked me off my feet for more than a month. I'm still not awfully recovered.. Here is is what I did create.
I had a one for one apothecary bottle swap. I had this glass bell ornament from Melissa Frances, 1962 Embellishments line and thought how cool this would look. The cat/poison apple statue is a big box item that I had in my stash.

The bats are a La-La Land Crafts die that I absolutely love. I cut the bats from Lucky Squirrel black shrink plastic, prepunched a hole and attached the wire before shrinking.
My vampire blood vile is a old watch parts glass tube I had picked up at an estate sale colored with some alcohol ink.

Fairy fingers are bits and pieces from a plastic skeleton I have cut apart and used here and there. The base is covered with some scrap halloween paper and has some moss scattered around. I hope my swap partner enjoys this as much as I have making it.
My last project was a haunted house page for another swap in my yahoo group.
I had a one for one apothecary bottle swap. I had this glass bell ornament from Melissa Frances, 1962 Embellishments line and thought how cool this would look. The cat/poison apple statue is a big box item that I had in my stash.

The bats are a La-La Land Crafts die that I absolutely love. I cut the bats from Lucky Squirrel black shrink plastic, prepunched a hole and attached the wire before shrinking.
My vampire blood vile is a old watch parts glass tube I had picked up at an estate sale colored with some alcohol ink.

Fairy fingers are bits and pieces from a plastic skeleton I have cut apart and used here and there. The base is covered with some scrap halloween paper and has some moss scattered around. I hope my swap partner enjoys this as much as I have making it.
Here are some tags I created for a swap in my yahoo group AlteredWithOutLimits. These were fun. Took a #8 tag and layers paint and inks to give the spooky effect. This haunted house is a die also from La-La Land Crafts. More shrink plastic bats. The pumpkins are also shrink plastic.
My last project was a haunted house page for another swap in my yahoo group.
I created my page with a spooky word background. Spritzed it with some orange and yellow and stamped a couple of images on. Several Tim Holtz items to be found here..the house, crow and cat and the gingerbread on the bottom. More shrink plastic was used. My little monster in the windows are fake fingernails. Not sure where I found them but thought they would be a fun addition.
Labels:
apothecary,
bats,
bird,
blood,
bones,
cat,
glitter,
halloween,
haunted house,
spooky
Monday, September 23, 2013
Getting my creep on with Barbie
I recently hosted a swap over at ArtCharms called Getting Your Creep on. The specifications of the swap was to use doll/body parts. I started out with 10 Barbie dolls and created 33 "creepy" charms.
I started out pulling off Barbies head. I used the face portion of the head and maneuvered them to fit in a bottle cap. I then pounded over the edge to help hold them in place.
I had to use those cute little ears hidden under all that hair. I had these cute little bottles that I thought would make a great vessel to hold the ears.
For my last charm I used Barbies hands. I used a brass cap to cover the end of the hand/arm where I had cut it off and with a little bit of wire wrapping it had a completed look.
Here is my completed project with all the Get Your Creep On charms swapped over at ArtCharms.
I started out pulling off Barbies head. I used the face portion of the head and maneuvered them to fit in a bottle cap. I then pounded over the edge to help hold them in place.
I had to use those cute little ears hidden under all that hair. I had these cute little bottles that I thought would make a great vessel to hold the ears.
For my last charm I used Barbies hands. I used a brass cap to cover the end of the hand/arm where I had cut it off and with a little bit of wire wrapping it had a completed look.
Here is my completed project with all the Get Your Creep On charms swapped over at ArtCharms.
Thursday, September 12, 2013
Wind-ohhh Charms
Who wouldn't like charms for their window. I had this great idea to take a beautiful fork and add some bead and a chandelier crystal. What fun to have the light reflecting off the crystals.
I started out with these great forks I found at an estate sale. Cut out the center tines and played with bending the outer one. I didn't care for the look since I was not able to get them some what the same. So in the end I cut all the times off and drilled some holes. Letter punched the word dream on each one. Wire wrapped some seed style beads around the bottom and attached my crystal. These were fun to do. I see myself searching out some more old silverware and having one hanging in each of my windows.
Thursday, August 22, 2013
For the love of bugs....Riveting, Reconstructing, Animating
I had the opportunity to take a quick trip to Chicago to take a class with Gail Crosman Moore at CREATE. Her workshop left my head spinning with ideas. We deconstructed raw brass stampings and created pieces with movement and dimension. I thought I would share my creation.
Gail shared some of her favorite coloring techniques. They ranged from alcohol inks to fingernail polish to rub and buff and gilders paste. I loved the idea of fingernail polish. I used this wonderful lime green on by bugs body, his head is actually orange in color and his wings are purple. His short wings are what give movement to my creation. I'm still working what I'm going to hang him from.
Labels:
alcohol ink,
brass,
bug,
cold connection,
metal,
rivet
Friday, August 16, 2013
Summer time... summer time... summer time
Where has the summer gone. It's hard to believe it is the middle of August already. I have been slacking on posting here. And sigh!!! that was one of my goals this year was to be better. I have been extremely busy this summer. My mom and her new husband visiting, having my grandkids for a visit, 70th birthdays (for my uncles not me), grand kids birthdays, the list goes on and on..
One of my joys is my camera. Now I have a nice camera and I don't use it to its full potential. And at times treat it like its a point and shoot (shame on me). For the most part the pictures I take are for me.. I thought I would share some with you. I must say the sassy goose was taken by my grand son (13) while he was here on a visit. I love this picture..
I have this butterfly bush. Now this year its not as spectacular as it has been in years past. But my family eagerly awaits for it to blossom each year to watch our butterfly/pretty moth visitors. The monarchs are the trickiest to photograph, they are flighty when a unknown object is moving around but I was able to get this shot.. but believe me it took a bit of snap and wait for him to land again and try over.
Now I know there are "rules" as to what is a butterfly and what is a moth.. we just like the beauty of them. A couple of years ago the bush was huge and loaded with flowers.. it drooped being so heavy with blooms and we had hundreds... yes hundreds of monarchs and other flying beauties. this year not so much.
Today was a bumble bee day. The bush is loaded with them collecting nectar. So many in fact I snapped a couple of pics and got out of there.
Here is one last pic of a visitor to my butterfly bush.
One of my joys is my camera. Now I have a nice camera and I don't use it to its full potential. And at times treat it like its a point and shoot (shame on me). For the most part the pictures I take are for me.. I thought I would share some with you. I must say the sassy goose was taken by my grand son (13) while he was here on a visit. I love this picture..
I have this butterfly bush. Now this year its not as spectacular as it has been in years past. But my family eagerly awaits for it to blossom each year to watch our butterfly/pretty moth visitors. The monarchs are the trickiest to photograph, they are flighty when a unknown object is moving around but I was able to get this shot.. but believe me it took a bit of snap and wait for him to land again and try over.
Now I know there are "rules" as to what is a butterfly and what is a moth.. we just like the beauty of them. A couple of years ago the bush was huge and loaded with flowers.. it drooped being so heavy with blooms and we had hundreds... yes hundreds of monarchs and other flying beauties. this year not so much.
Today was a bumble bee day. The bush is loaded with them collecting nectar. So many in fact I snapped a couple of pics and got out of there.
Here is one last pic of a visitor to my butterfly bush.
Sunday, June 30, 2013
New Neighbors... fairies have arrived.
It started out as a simple project. I had this bird cage that I just love. The bent wire hearts on the doors just spoke to me. I have had it tucked away for some time. I was cleaning out my flower bed and realized my hen and chicks could use a cleaning out. I remembered the bird cage and thought how cool would that be.
I transplanted the hens and chicks and they took right off. Found the Dragons tail and it was coming together. How about a fairy house? I shopped around a little and just wasn't finding what I had in mind.
So the decision was to make one. With some basic plumbing pvc, (3 inch pvc drain pipe for the body, 3 inch to 1 1/2 reducer for the roof and a 1 1/2 cap) and my all time favorite clay, Aves Apoxie. I set out making my fairy house.
I mixed my apoxie clay and then rolled out a thin layer, covering the drain pipe. I then took a texture plate made by wilton for the stone texture. Pressing it around the clay covered pipe base. The clay needs to cure over night. While waiting on that I covered the roof (reducer) with mosaics.
I painted everything a very light blue and then did a wash of raw umber to highlight the stones and give a aged look to the roof.
I picked up some little fairies at a estate sale recently. She fit perfectly looking out the window. I had gotten this far and something was still missing. That is when I added the flower boxes on the windows and also decided I need to have a door. The door is covered with apoxie clay and texture mold was used to give it that wood look.
I see more of these in my future. It was fun creating and I have already thought of so many other things I would do. I am on the search for some more miniature succulents to add to this.. I see my little fairy garden expanding.
I thought I would end showing you what I used. Also how my door and windows came about. A big thank you to my husband for cutting them out for me.
So the decision was to make one. With some basic plumbing pvc, (3 inch pvc drain pipe for the body, 3 inch to 1 1/2 reducer for the roof and a 1 1/2 cap) and my all time favorite clay, Aves Apoxie. I set out making my fairy house.
I mixed my apoxie clay and then rolled out a thin layer, covering the drain pipe. I then took a texture plate made by wilton for the stone texture. Pressing it around the clay covered pipe base. The clay needs to cure over night. While waiting on that I covered the roof (reducer) with mosaics.
I painted everything a very light blue and then did a wash of raw umber to highlight the stones and give a aged look to the roof.
I picked up some little fairies at a estate sale recently. She fit perfectly looking out the window. I had gotten this far and something was still missing. That is when I added the flower boxes on the windows and also decided I need to have a door. The door is covered with apoxie clay and texture mold was used to give it that wood look.
I see more of these in my future. It was fun creating and I have already thought of so many other things I would do. I am on the search for some more miniature succulents to add to this.. I see my little fairy garden expanding.
I thought I would end showing you what I used. Also how my door and windows came about. A big thank you to my husband for cutting them out for me.
Monday, June 10, 2013
It's all in the numbers..
I recently hosted a swap with a yahoo group I belong to ArtCharms owned by Christine and Peg coauthors of Making Mixed Media Art Charms. I had a amazing response to this swap. I had hoped to get one group of 10 players and ended up with five groups of 10. I played in four of the 5 groups and here are my charms. The theme I choose for the swap was altered numbers. Every charm needed to have a number or numbers on it.
My first charm is a altered casino dice. From a local casino here in Michigan. After so many rolls they are discarded. The nice part is they came with a hole already drilled through them. Easy peasy...
My second charms I created from a engineers ruler. You know the ones that are triangle shaped. After cutting the ruler into pieces I then painted the cut edge to match the color of the ruler.. in this case raw sienna. I applied some silver and copper leafing to give it some bling and a little copper wire wrapping for a loop. The silver numbers are a scrapbooking embellishment.. a snap kinda thing. I attached it to the cut surface.
Basic expandable wooden ruler was used for this charm. Cut into segments on the chop saw and drilled to add a eyelet to hold a jump ring.
This charm is a mini domino from a local dollar store. I drilled a hole for a jump ring and also to hang a vintage number. The numbers were from a signage display I purchased from a local meat market. You remember those... the weekly specials spelled out in letters and price.
A vintage white button with another numbered button stacked and then wire wrapped.
Here are some of the other fantastic charms from the participants. This was such a fun swap. And it had such a great turnout of players.
Wednesday, May 15, 2013
I just love etching...
I love etching.. and on copper I am in heaven. I have been looking through my stash of rubber stamps and decided to play and see what kind of etchings some of them would make..
As with all experiments some work and others not so much. I liked this one so much that I put it together as a gift for my mom. Hopefully by this posting it has arrived to her in Florida.
Thursday, May 9, 2013
Mojo's getting there
I committed to this project in hopes to regain some of my Mojo. I'm feeling creative again. The project is a 2 for 2 swap through Retro Cafe. I love their mini houses.
I spent a day papering and painting the houses and then just couldn't figure out where to go from there. So I put them up for a few days. I decided to start with creating in my box. Here is my blinking king cake baby playing in the pumpkin patch.
I have these vintage pipe cleaner snowman heads and bottle brush trees. With a little bit of mica flake glitter and diamonds dust a nice winter scene appeared.
This one is a little more out of my box. I'm really not into birds but as I was looking through my stash I realized I have several different owls. His nest is made from these copper flat wire strands and some faux moss with a few feathers tucked in for some nest fluff. Adding the stick to the frame just pulled it all together.
This one is a little more out of my box.. little cutsie for what I usually do. I have this stash of worry dolls and thought they would be fun to use. With a blue dew drop roof inked with black stazon and then covered with some vintaj antique cooper patina. I hand stamped a no worries banner and the little brass legs made it all fall together.. I am excited at how these turned out. Even had a quick second where I thought about keeping them.. but ahhh thats part of the challenge. I'm sure they will find good homes and be enjoyed as much as I did creating them.
I spent a day papering and painting the houses and then just couldn't figure out where to go from there. So I put them up for a few days. I decided to start with creating in my box. Here is my blinking king cake baby playing in the pumpkin patch.
I have these vintage pipe cleaner snowman heads and bottle brush trees. With a little bit of mica flake glitter and diamonds dust a nice winter scene appeared.
This one is a little more out of my box. I'm really not into birds but as I was looking through my stash I realized I have several different owls. His nest is made from these copper flat wire strands and some faux moss with a few feathers tucked in for some nest fluff. Adding the stick to the frame just pulled it all together.
This one is a little more out of my box.. little cutsie for what I usually do. I have this stash of worry dolls and thought they would be fun to use. With a blue dew drop roof inked with black stazon and then covered with some vintaj antique cooper patina. I hand stamped a no worries banner and the little brass legs made it all fall together.. I am excited at how these turned out. Even had a quick second where I thought about keeping them.. but ahhh thats part of the challenge. I'm sure they will find good homes and be enjoyed as much as I did creating them.
Monday, May 6, 2013
Long time no see.. Sorry, I have been off the grid so long. In late January I took a few steps back with my shoulder surgery. I had been doing so good and then developed a bad case of bursitis. Which laid me up for 7 weeks, serious bummer. I also lost my creative mojo and its taken me a bit to get it back. I seriously haven't even looked at my blog for 4 months. Soo bad of me. I had a posting that should have happened on Jan. 31st.. I prescheduled it and as I see it didn't happen. I will figure out what is up with that and play catch me up.. Enough of that. Time to move forward. Here's what I have been up too.
This last weekend I had the privilege to take some workshops with Jen Crossley of A Mark In Time over at SmittenDust Studio in Diamondale, Michigan.
The first being this bird house pendant. My main focus of this workshop was soldering. For some reason I have not been comfortable soldering... so says the girl that torch fires like a mad woman. I don't know what was up with that. I learned so much and this class was so much fun. We had a great group that day.
I had another one that night and I still have to tweek it a bit so will be sharing that in the near future. I took saturday off and spent the morning and early afternoon off with my husband doing some estate sale and flea market shopping... so glad he enjoys this.
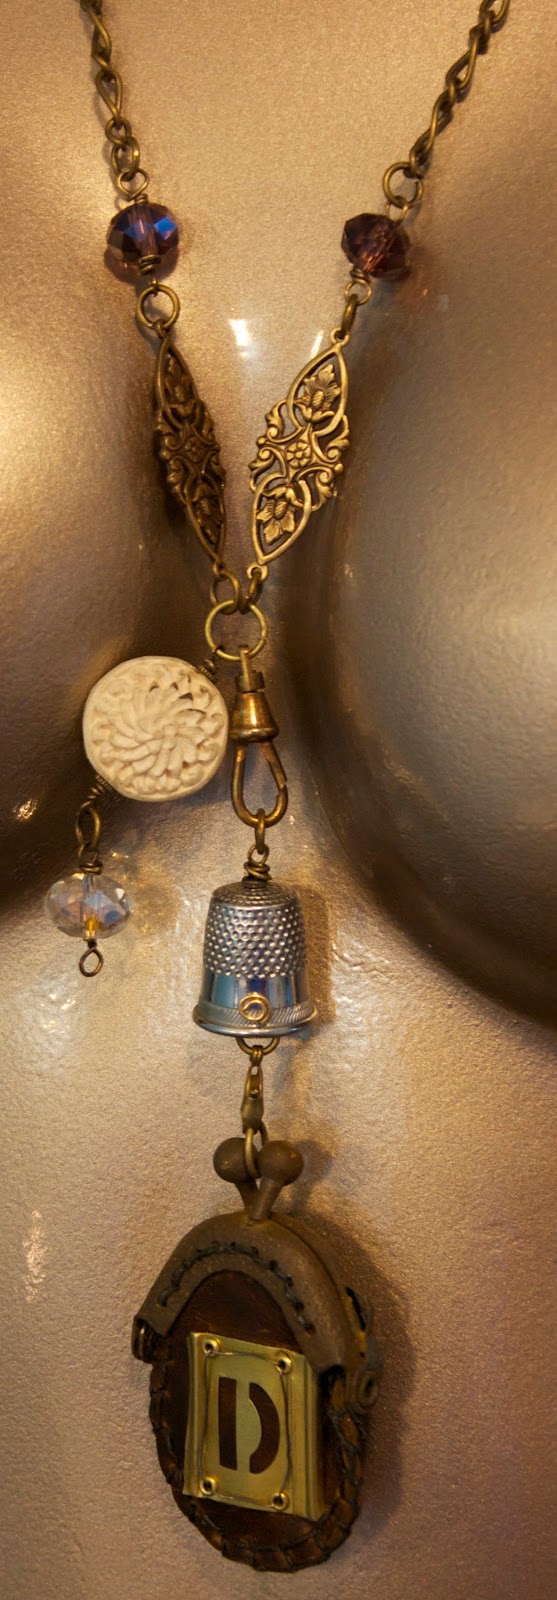
Yesterday we created these wonderful little bag pendants. "I CAN"T BELIEVE THAT WE MADE THESE LITTLE CLUTCHES!!!!!!" Jen walked us through the construction of our little bag. We tackled some wire wrapping skills and patina rusting. In our creative supplies were some fabulous tin type photos, vintage brass bobbles and beads. On mine I used a little vintage brass stencil I had. I am saving my tin type for the future. I used the stencil in place only because my other creation (too be shared at a later date) has a portrait tin type.
Happy creating everyone.. more to come.
Sunday, December 30, 2012
It has been forever since I made a post. Lots have been going on. Lots that I thought I was going to share and now have to put in the hold file.. hehe.. But all is good.
I don't get too personally sentimental here on my blog. But with the New Year knocking on our door, thought I would share.
My dads side of the family is a interesting mix for me. For the most part they are the village that made me the person I am today.
This last year I lost one of my favorite Aunts. She encouraged me to think out of the box. The major part of this learning spirit happened the summer of 1974 (age 15) when I went to spend a few weeks with them to help out with my little cousins as my aunt had just had a new baby. As they lived in northern Michigan in the middle of no where, my aunt had signed me up for ceramics class as time away from my babysitting duties. I remember butting heads with the ceramics instructor.. I had picked out this chicken cookie jar to make.. I wanted to color it with chalks. The instructor was set on that was not how you should do it. I went home voicing to my aunt that I didn't want to paint it like the everyone else did. I had a different look for my jar.. I'm sure it was a phone call or a stop by the shop before the next week when I went back I was allowed to do what I wanted to do without any negative instruction. To this day that silly chicken is one of my favorite pieces I have made. I wouldn't change a thing I did.
In my adult life I did not see her as much as I should have... more like the usual gatherings.. weddings, funerals and a baby shower here and there.. But it was always a joy to see her and catch up. My Aunt Ruthie loved antiques.. the more unusual the better. It was always exciting to hear what new item she had acquired. And loved to see the expression of one of my cousins faces as they would roll their eyes in that what you going to do with that look.
This fall was her estate sale. I took this opportunity to make the 2 and half hour drive north to wander around the property and reminisce. I didn't go up with any intention of really purchasing anything. But to my surprise the above cabinet was in the sale. It was one of her favorite pieces, the other being this awesome buffet with marble top. It needs a little bit of work.. With the help of my husband we will fix it without changing any of the outside look. The paint patina is just awesome. I am pretty sure my aunt hadn't done anything with it since she purchased it. I acquired the dust bunnies and spider goobers, probably a good thing I hadn't looked inside the drawers before I loaded it up to bring it home... lol.
Most of the drawer bottoms are made from what appears to be a stock market recording chalkboard. I love the reuse of items. Make it or fix it with materials on hand. The drawers are broken up into little compartments, with a couple full drawers. At some point in time someone decided the drawers needed to be numbered.. Adds so much character to the piece. In one of the drawers I found a baggie of linograph press letters. Could that been the use for this.. held letters in a print shop?? Wish I could get a picture of them.. but they are so small I couldn't get anything that you could see what they were. Its fun to just imagine what it might have been used for. With the little cubbies it must have had a definite purpose. The color is closer to the picture below.. much more green tone than whitish.
This piece has quickly become one of my cherished pieces. For now it will be in my living room while we do some work to sturdy it up. I think at some point it will end up in my studio. It has to be a useful piece for me.. if I can't use it to store items.. it's not much use.
My aunt encouraged self expression. As long as it did not hurt others and was respectful. This lesson I have tried to follow in my life.
Happy New Year everyone.
Saturday, November 3, 2012
Wrapping things up
I've completed another fun swap over at ArtCharms yahoo group. This time we are doing wired wrapped. This has been a fun but challenging swap. The one rule we had other than the basic charm making rules. If you choose to use another element, it can not out shine your wire wrapping. Boy.. When I signed up for this I knew exactly what I wanted to do and also a bead I wanted to use.
Since I love copper, my metal of choice. Awhile back I found these small faceted beads that are a light purple in tone with a iridescent copper shadowing part of the bead. When I saw them I knew they would look great with some copper wire wrap.
These will be making there way to our hostess.
Subscribe to:
Posts (Atom)